LED Blinker: Component Design and Initial Implementation
The purpose of this exercise is to walk you through the creation and initial implementation of an F´ component to control the blinking of an LED. This section will discuss the design of the full component, the implementation of a command to start/stop the LED blinking, and the sending of events. Users will then proceed to the initial ground testing before finishing the implementation in a later section.
Component Design
In order for our component to blink an LED, it needs to accept a command to turn on the LED and drive a GPIO pin via a port call to the GPIO driver. It will also need a rate group input port to control the timing of the blink. Additionally, we will define events and telemetry channels to report component state, and a parameter to control the period of the blink.
This component design is captured in the block diagram below with input ports on the left and output ports on the right. Ports for standard F´ functions (e.g. commands, events, telemetry, and parameters) are circled in green.
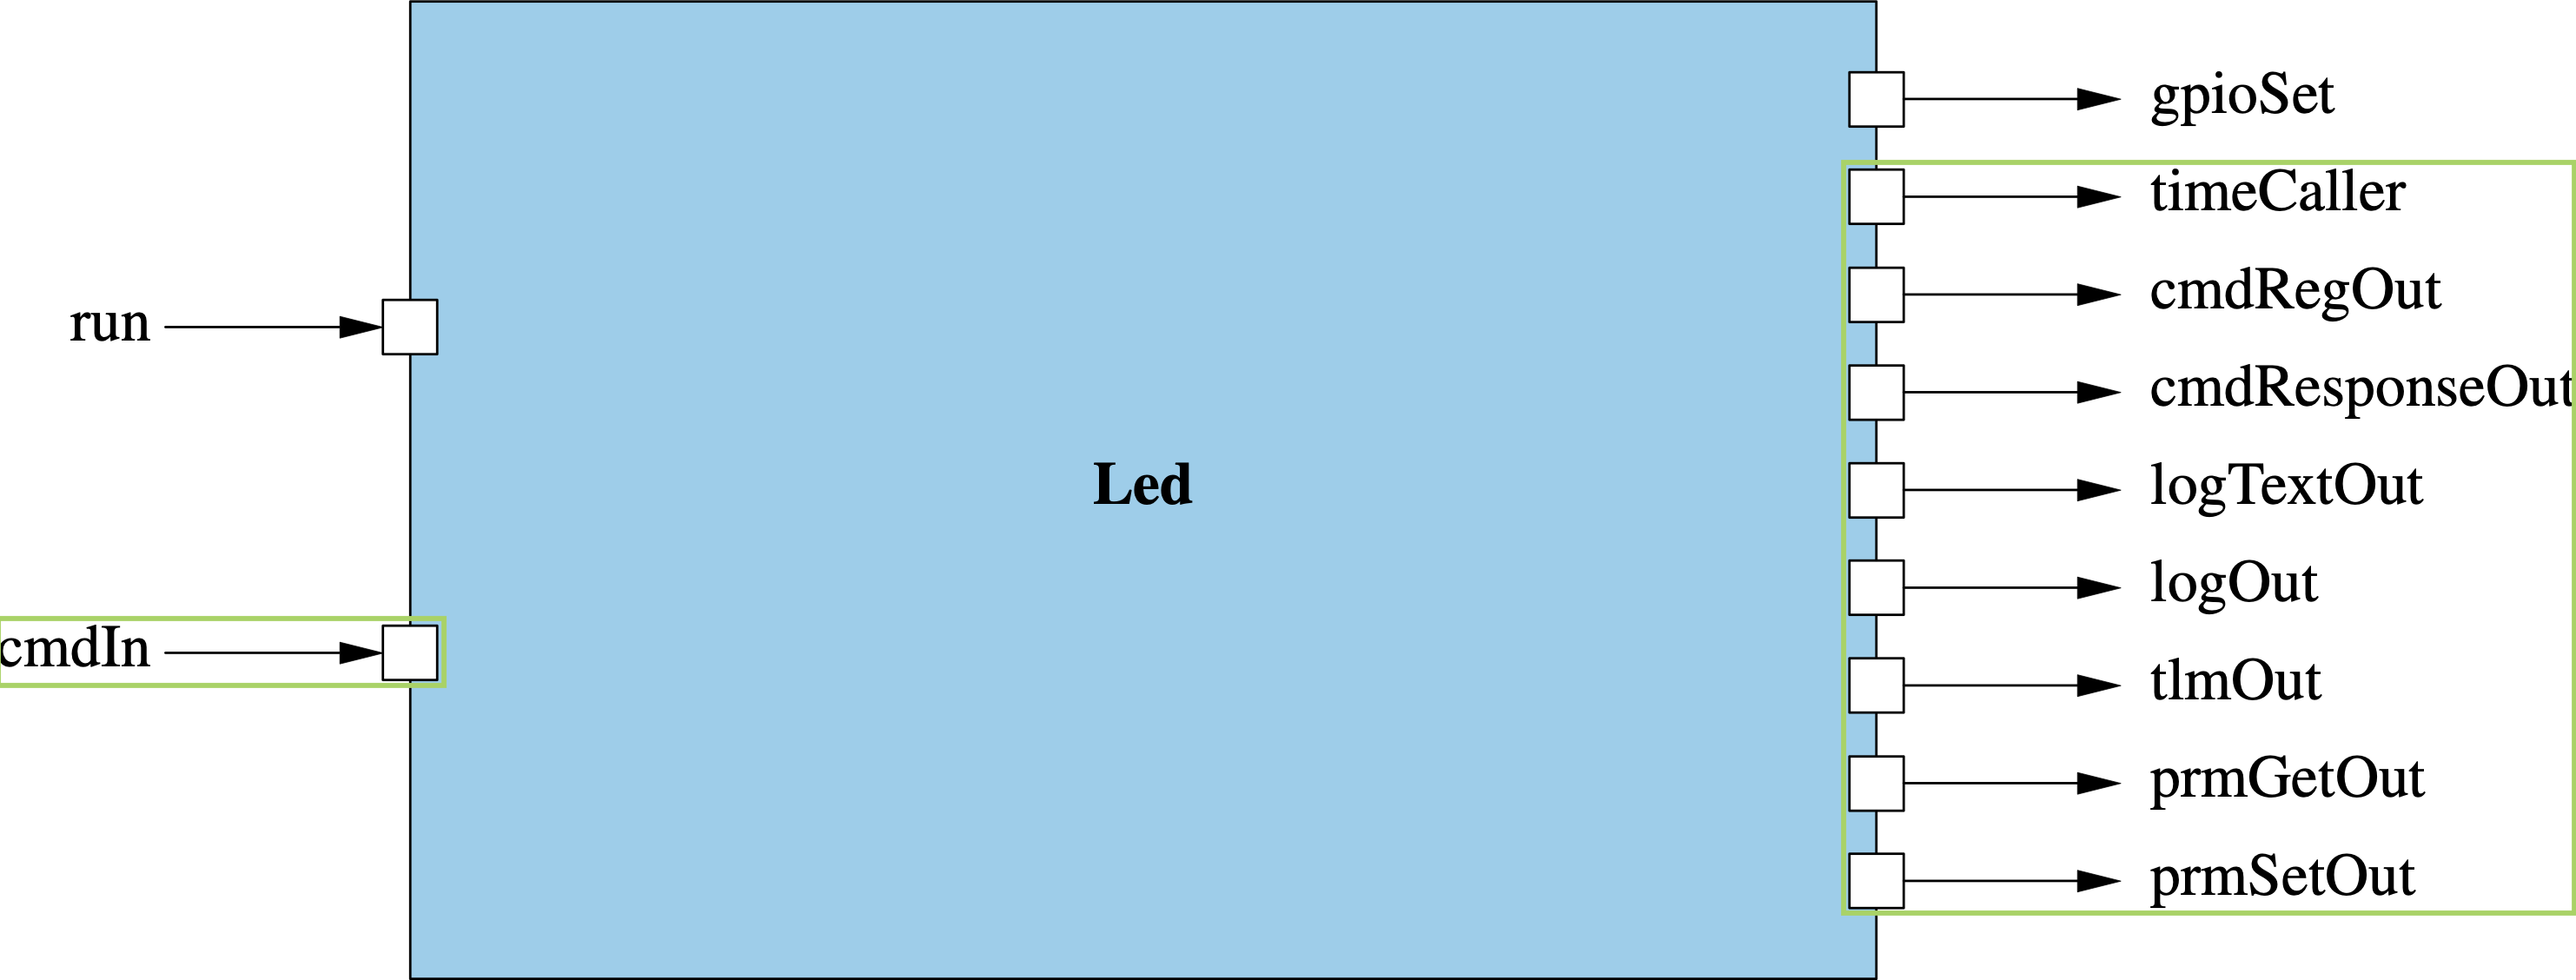
In this exercise, the BLINKING_ON_OFF command shall toggle the blinking state of the LED. The period of the blinking is controlled by the BLINK_INTERVAL parameter. Blinking is implemented on the run rate group input port. The component also defines several telemetry channels and events describing the various actions taken by the component.
Design Summary
Component Ports:
run: invoked at a set rate from the rate group, used to control the LED blinkinggpioSet: invoked by theLedcomponent to control the GPIO driver
Standard component ports (circled in green) are not listed here.
Commands:
BLINKING_ON_OFF: turn the LED blinking on/off
Events:
InvalidBlinkArgument: emitted when an invalid argument was supplied to theBLINKING_ON_OFFcommandSetBlinkingState: emitted when the component sets the blink stateBlinkIntervalSet: emitted when the component blink interval parameter is setLedState: emitted when the LED is driven to a new state
Telemetry Channels:
BlinkingState: state of the LED blinkingLedTransitions: count of the LED transitions
Parameters:
BLINK_INTERVAL: LED blink period in number of rate group calls
Create the component
It is time to create the basic component. In a terminal, navigate to the project’s root directory and run the following:
# In led-blinker
mkdir -p Components
cd Components

fprime-util generate
fprime-util new --component
You will be prompted for information regarding your component. Fill out the prompts as shown below:
[INFO] Cookiecutter source: using builtin
  [1/8] Component name (MyComponent): Led
  [2/8] Component short description (Component for F Prime FSW framework.): Component to blink an LED driven by a rate group
  [3/8] Component namespace (Components): Components
  [4/8] Select component kind
    1 - active
    2 - passive
    3 - queued
    Choose from [1/2/3] (1): 2
  [5/8] Enable Commands?
    1 - yes
    2 - no
    Choose from [1/2] (1): 1
  [6/8] Enable Telemetry?
    1 - yes
    2 - no
    Choose from [1/2] (1): 1
  [7/8] Enable Events?
    1 - yes
    2 - no
    Choose from [1/2] (1): 1
  [8/8] Enable Parameters?
    1 - yes
    2 - no
    Choose from [1/2] (1): 1
[INFO] Found CMake file at 'led-blinker/project.cmake'
Add Components/Led to led-blinker/project.cmake at end of file? (yes/no) [yes]: yes
Generate implementation files? (yes/no) [yes]: yes
Your new component is located in the directory led-blinker/Components/Led.
Component State
Many of the behaviors of the component discussed in the Component Design section require the tracking of some state. Before diving into the implementation of the behavior let us set up and initialize that state.
Open Led.hpp in led-blinker/Components/Led, and add the following private member variables to the end of the file.
  PRIVATE:

    Fw::On state; //! Keeps track if LED is on or off
    U64 transitions; //! The number of on/off transitions that have occurred from FSW boot up
    U32 count; //! Keeps track of how many ticks the LED has been on for
    bool blinking; //! Flag: if true then LED blinking will occur else no blinking will happen
Open Led.cpp in led-blinker/Components/Led, and initialize your member variables in the constructor:
Led ::Led(const char* const compName) : LedComponentBase(compName),
    state(Fw::On::OFF),
    transitions(0),
    count(0),
    blinking(true)
{}
Now that the member variables are set up, we can continue into the component implementation.
The above code will fail to find the
Fw::Onenum type until we use it in the FPP model in the next section. To fix immediately, add#include <Fw/Types/OnEnumAc.hpp>to the top ofLed.hpp.
Commands
Commands are used to command the component from the ground system or a command sequencer. We will add a command named BLINKING_ON_OFF to turn on or off the blinking LED. This command will take in an argument named on_off of type Fw.On.
Inside your led-blinker/Components/Led directory, open the file Led.fpp and search for the following:
        # @ Example async command
        # async command COMMAND_NAME(param_name: U32)
Replace that block with the following:
        @ Command to turn on or off the blinking LED
        sync command BLINKING_ON_OFF(
            on_off: Fw.On @< Indicates whether the blinking should be on or off
        )
Exit the text editor, and run the following in the led-blinker/Components/Led directory:
# In led-blinker/Components/Led
fprime-util impl
This command will auto generate two files: Led.template.hpp and Led.cpp-template. These files contain the stub implementation for the component. These should now include stubs for this newly added command.
Inside your led-blinker/Components/Led directory, open Led.template.hpp and copy the following block of code. Paste it as a private function above the private member variabls in Led.hpp.
      //! Implementation for BLINKING_ON_OFF command handler
      //! Command to turn on or off the blinking LED
      void BLINKING_ON_OFF_cmdHandler(
          const FwOpcodeType opCode, /*!< The opcode*/
          const U32 cmdSeq, /*!< The command sequence number*/
          Fw::On on_off /*!<
          Indicates whether the blinking should be on or off
          */
      );
Inside your led-blinker/Components/Led directory, open Led.template.cpp and copy the following block of code and paste it into Led.cpp below the destructor.
  void Led ::
    BLINKING_ON_OFF_cmdHandler(
        const FwOpcodeType opCode,
        const U32 cmdSeq,
        Fw::On on_off
    )
  {
    // TODO
    this->cmdResponse_out(opCode,cmdSeq,Fw::CmdResponse::OK);
  }
This pattern of copying implementations from template files into our cpp and hpp files will be repeated throughout the rest of this tutorial.
Now we will implement the behavior of the BLINKING_ON_OFF command. An initial implementation is shown below and may be copied into Led.cpp in-place of the stub we just copied in.
  void Led ::
    BLINKING_ON_OFF_cmdHandler(
        const FwOpcodeType opCode,
        const U32 cmdSeq,
        Fw::On on_off
    )
  {
    // Create a variable to represent the command response
    auto cmdResp = Fw::CmdResponse::OK;

    // Verify if on_off is a valid argument.
    // Note: isValid is an autogenerate helper function for enums defined in fpp.
    if(!on_off.isValid())
    {
        // TODO: Add an event that indicates we received an invalid argument.
        // NOTE: Add this event after going through the "Events" exercise.

        // Update command response with a validation error
        cmdResp = Fw::CmdResponse::VALIDATION_ERROR;
    }
    else
    {
      this->count = 0; // Reset count on any successful command
      this->blinking = Fw::On::ON == on_off; // Update blinking state

      // TODO: Add an event that reports the state we set to blinking.
      // NOTE: This event will be added during the "Events" exercise.

      // TODO: Report the blinking state via a telemetry channel.
      // NOTE: This telemetry channel will be added during the "Telemetry" exercise.
    }

    // Provide command response
    this->cmdResponse_out(opCode,cmdSeq,cmdResp);
  }
Save the file then run the following command in the terminal to verify your component is building correctly.
# In led-blinker/Components/Led
fprime-util build
Fix any errors that occur before proceeding with the rest of the tutorial.
Events
Events represent a log of system activities. Events are typically emitted any time the system takes an action. Events are also emitted to report off-nominal conditions. Our component has four events, two that this section will show and two are left to the student.
Back inside your led-blinker/Components/Led directory, open the Led.fpp file. After the command you added in the previous section, add two events:
        @ Indicates we received an invalid argument.
        event InvalidBlinkArgument(badArgument: Fw.On) \
            severity warning low \
            format "Invalid Blinking Argument: {}"

        @ Reports the state we set to blinking.
        event SetBlinkingState($state: Fw.On) \
            severity activity high \
            format "Set blinking state to {}."
Save the file and in the terminal, run the following to verify your component is building correctly.
# In led-blinker/Components/Led
fprime-util build
Resolve any errors before continuing.
Now open Led.cpp in your led-blinker/Components/Led directory and navigate to the BLINKING_ON_OFF command. Report via our new event when there is an error in the input argument.
To do so, replace:
        // TODO: Add an event that indicates we received an invalid argument.
        // NOTE: Add this event after going through the "Events" exercise.
with:
this->log_WARNING_LO_InvalidBlinkArgument(on_off);
Similarly, use an event to report the blinking state has been set.
Replace the following:
      // TODO: Add an event that reports the state we set to blinking.
      // NOTE: This event will be added during the "Events" exercise.
with:
this->log_ACTIVITY_HI_SetBlinkingState(on_off);
Save the file and in the terminal, run the following to verify your component is building correctly.
fprime-util build
Finally, add the BlinkIntervalSet event with an argument of U32 type to indicate when the interval parameter is set and the LedState event with an argument of Fw.On type to indicate that the LED has been driven to a different state. You will emit these event in later sections. Build the component again to prove the FPP file is correct.
Resolve any
fprime-util builderrors before continuing
Conclusion
Congratulations! You have now implemented some basic functionality in a new F´ component. Before finishing the implementation, let’s take a break and try running the above command through the ground system. This will require integrating the component into the system topology.
When running in the ground system try running
led.BLINKING_ON_OFFwith a value ofONand ensure that the eventSetBlinkingStateis emitted indicating the blinking switched to on!